W1209 DC 12V heat cool temp thermostat temperature control switch temperature controller thermometer thermo controller
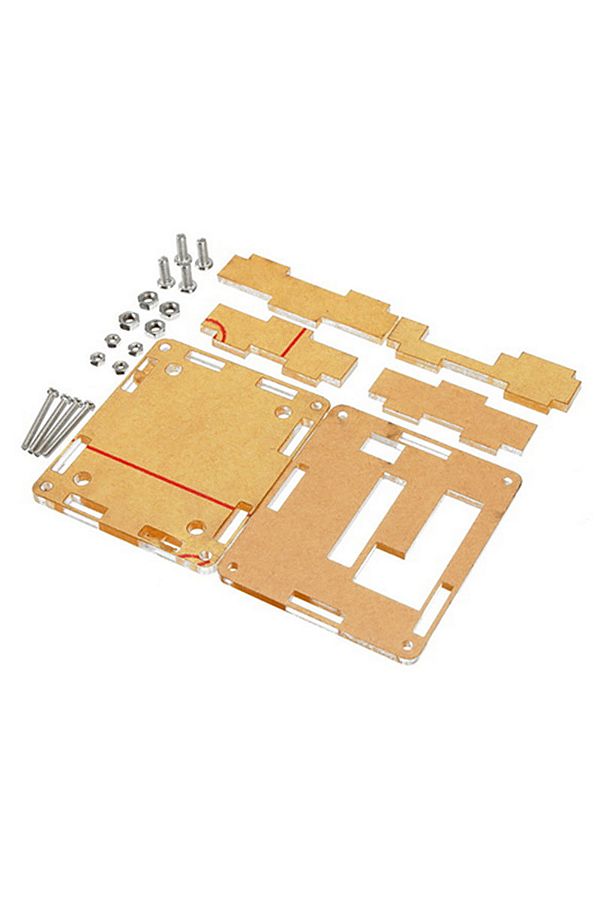
Product Introduction: W1209 case
Weight: 24 grams
Shell size: 59.3mm * 50.3mm * 14.5mm
Attention: Each board comes with double-sided protective film, which needs to be peeled off before use
Product Parameters: W1209 module
Temperature control range:-50°C-110°C
Input voltage:DC12V
Temperature measurement accuracy:0.1°C
Brush frequency: 0.5S
Temperature measurement input: NTC (10K0.5%) waterproof line pyrometer
Power consumption: quiescent current <35MA, suction current less than 65MA
Temperature measurement output: 1 road 10A relay
Display type: 0.28-inch red three-digit digital tube
Temperature difference accuracy: 0.1°C
Weight:20g
High temperature protection: 0-110°C
Size:48.5mm*39.8mm*14.9mm(L*W*H)
Resolution:0.1°C at -9.9-99.9, other 1°C
Packing:Electrostatic bag
W1209 Digital Display Intelligent Thermostat (Function Setting):
Code:Code digital , Setting range, Factory setting
PO: Cooling/Heating , C/H, C
P1: Return difference setting, 0.1-30, 2
P2: Set temperature upper limit ,110°C,110
P3: Setting temperature lower limit, -50°C, -50
P4: Temperature calibration, -7°C to 7°C, 0
P5: Delayed start time, 0-600S, 0
P7: High temperature alarm, 0-110°C, OFF
P8: Restore factory defaults, C/H, C
Long press +- to turn on the power in the off state can restore the factory settings
Operation method:
. Usage
Connect the power supply and equipment, you can power supply for the controller, this time the display for the measurement of temperature, press the 5ET key once, the display temperature blinking, press “+” “_” to set the desired temperature (hold down the key for more than 5 seconds can be quickly raised and lowered) Setting is complete, press the SET to confirm the return, the controller at this time according to the set temperature automatically execute the relay on and off!
Second, the indicator, digital tube status description indicator: blinking that the cooling or heating start delay, light indicates that the relay has been closed digital tube: display 888 for the sensor open circuit, please connect the sensor according to the instructions; display HHH for the highest temperature beyond the measurement range, the thermostat will be forced to disconnect the relay: display LLL for the lowest temperature beyond the measurement range, the thermostat will be forced to disconnect the relay display - - for high temperature alarm, the thermostat will be forced to disconnect the relay display - - for high temperature alarm, the thermostat will be forced to disconnect the relay. - for high temperature alarm, the thermostat will force the relay to disconnect; - for high temperature alarm, the thermostat will force the relay to disconnect.
Third, parameter function description long press SET 5 seconds to enter the main menu settings, press eleven to switch P0...P6, long press SET 5 seconds to enter the main menu settings, press eleven to switch P0.... P6, long press SET or 10 seconds without key action controller automatically confirms the return.
PO cooling, heating mode.
Long press SET 5 seconds to display P0, press SET once to set the working mode, press ten - switch [H for heating mode] [C for cooling mode] press SET once to return, long press SET or 10 seconds without key action controller automatically confirms the completion. Refrigeration mode: when the temperature measurement value > temperature set point, refrigeration relay absorption chiller start; when the temperature measurement value ≤ temperature set point - back to the difference, refrigeration relay disconnect, the chiller off.
Heating mode: When the temperature measurement value ≤ temperature set point, the heating relay is engaged and the heater is activated; when the temperature measurement value > temperature set point + return difference, the heating relay is disconnected and the heater is turned off.
P1 Return difference setting.
Long press SET for 5 seconds to display P0, press eleven to switch to P1, press SET once to set the value of return difference, press ten- to set the return difference as 0.1-15, press SET once to return after completion, long press SET or 10 seconds without key action controller automatically confirms the completion.
In cooling mode.
When the temperature measurement value > set value, the relay will absorb, and the cooler will start; when the temperature measurement value ≤ set value - return difference value, the relay will disconnect, and the cooler will shut down.
For example, the environment for the 30 ℃ set value of 25 ℃, the return difference is set to 2 ℃, power on the relay closure chiller start, when the cooling to 23 ℃, the relay disconnect chiller closed at this time due to the chiller has been disconnected the temperature began to rise, when the rise to the set value of 25 ℃, the relay closure chiller start again, and so on repeated cycles to control the temperature is not higher than 25 ℃.
In heating mode.
When the temperature measurement value ≤ set value, the relay is closed and the heater starts; when the temperature measurement value > set value + return difference value, the relay is disconnected and the heater turns off.
For example, the environment is 10 ℃ set value of 25 ℃, the return difference is set to 2 ℃, after power on the relay closure heater start, when heated to 27 ℃, the relay disconnect heater off at this time due to the heater has been disconnected the temperature began to fall, when down to the set value of 25 ℃, the relay closure heater start again, and so on repeated cycles to control the temperature is not lower than 25 ℃.
P2 maximum temperature setting upper limit:
In order to avoid danger caused by others' misoperation resulting in too high a set temperature, this thermostat has a maximum setting upper limit function, which limits the setting range of the maximum temperature set point controlled by the thermostat.
Long press SET for 5 seconds to display P0, press eleven to switch to P2, press SET once to set the maximum upper limit, press ten to set the maximum settable temperature, the maximum value of 110, press SET once to return to the completion of the long press SET or 10 seconds without key action controller automatically confirms the completion of the.
For example: set to 60 Temperature set point can only be set to a maximum of 60 ℃ If you want the temperature set point higher temperature range to expand, you need to adjust the upper limit of the set value.
P3 Minimum temperature setting lower limit.
In order to avoid ice blockage caused by others misoperation resulting in too low temperature, this thermostat has the function of minimum setting upper and lower limit, which limits the setting range of the lowest temperature set point controlled by the thermostat.
Long press SET for 5 seconds to display P0, press eleven to switch to P3, press SET once to set the lowest lower limit, press ten - to set the lowest settable temperature, the lowest value is -50, after completion, press SET once to return, press SET for a long time or for 10 seconds without key action controller automatically confirms completion.
For example: set to 2 temperature set point can only be set to the lowest 2 ℃ If you want the temperature set point lower temperature range to expand, you need to first adjust the lower limit of the set value.
P4 Temperature correction.
When the measured temperature and the standard temperature deviation or due to the user's hardware have special needs, you can use this function to correct, the corrected temperature = the pre-correction temperature + correction value Effective range of -7.0 ~ 7.0. long press SET 5 seconds to display the P0, press eleven to switch to the P4, press SET once for calibration press ten - Set the calibration value, after completion of the SET once to return to the long press SET or Long press SET or 10 seconds without key action controller automatically confirms the completion. For example, the normal display is 25 degrees; temperature correction for 0 shows 25 degrees; temperature correction for 1.5 shows 26.5 degrees; temperature correction for -1.5 shows 23.5.
P5 Delayed start time (unit: minutes).
When there is a need for delay time for chiller or heater work, the delay time function can be turned on to protect the life of the equipment.
Long press SET for 5 seconds to display P0, press eleven to switch to P5, press SET once to set the delayed start time unit is minutes, press ten - set 0-10 minutes, after completion, press SET once to return, long press SET or 10 seconds without key action controller automatically confirms completion.
In cooling mode.
The first time the power is turned on, if the current temperature > set value, the cooler will not start cooling immediately, it needs to run after the set delay time to start.
In heating mode.
The first time the power is turned on, if the current temperature is ≤ set value, the heater will not start heating immediately, it needs to run for a set delay time and then start. If the downtime between two adjacent starts of the chiller or heater is greater than the set value of delayed start time, the chiller will start immediately. When the downtime between two adjacent starts of the chiller or heater is less than the set value of the delayed start time, the unit will start again only after running the set delayed start time of the chiller. The delay time is calculated from the moment of shutdown. For example, under the cooling state set the delay time for 5 minutes, after power on the chiller start delay, 5 minutes after turning on the chiller when the desired temperature when the chiller stops, this time to start timing, when the next chiller start timing is completed immediately when the work is completed, not completed timing to wait for the end of the timing to work, the delay LED indicator blinking. Delay start set to 0 is equal to close the delay function.
Restore factory setting.
Due to some man-made reasons, the internal settings of the thermostat are confusing, and it takes time to set one by one, at this time, this function can be used to restore the factory settings, the specific method is as follows: in the state of shutdown, press and hold down the + and - buttons at the same time, and then turn on the power, and then all of the above parameters will be restored to the factory setting values.


 Secure payment


